
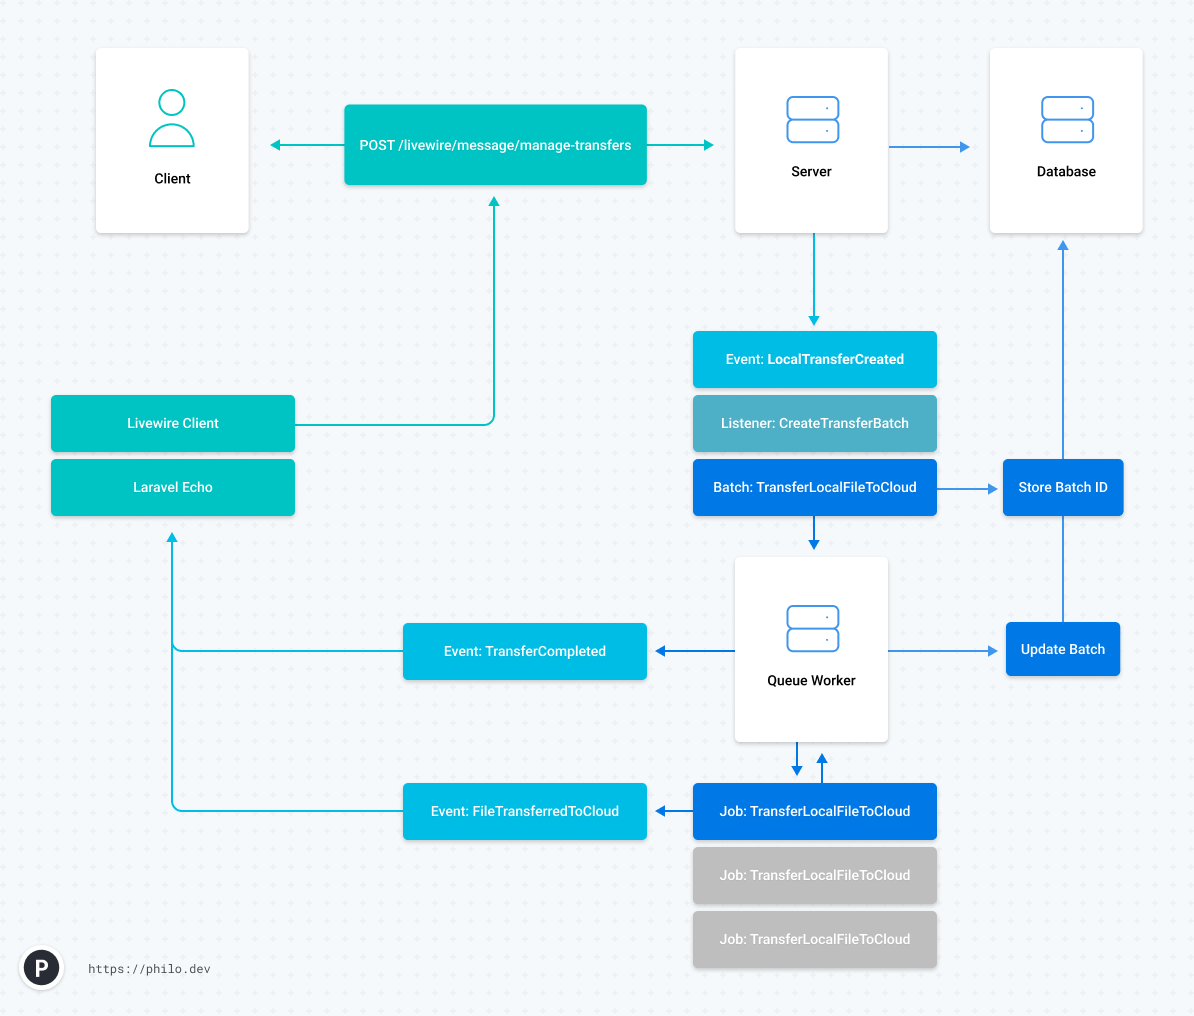
So I'm working on a cool project, and I was working on a feature that processes incoming files and uploads them to cloud storage. I thought Laravel batches would be ideal for this, which it was! I decided to combine the power of Laravel batches with events, Laravel Echo, and Livewire to show real-time progress to my users, and not to forget, some confetti to celebrate 🎉.
So in this article, I'm going to show you step-by-step how to do this so you can blow your customers away (with confetti).
What is Laravel Livewire?
Livewire is a full-stack framework for Laravel by Caleb Porzio that makes building dynamic interfaces super easy without writing a single line of Javascript, which is pretty awesome because you can create a SPA like feeling, again without having to write any Javascript. As mentioned on the Livewire website, the best way to understand it is to look at the code, so let's get started!
Installing Laravel, Livewire, and Tailwind CSS
I'm going to use a clean install of Laravel 8, but you can, of course, follow along with one of your existing projects as well.
Let's download and install Laravel, Livewire, and Tailwind CSS for those who want to start from scratch.
I will be focusing on Laravel batches and real-time progress with Livewire. If you are entirely new to Laravel, Livewire, or Tailwind CSS, all of these products have extensive and well-written documentation to help you get started.
# Install Laravel
laravel new laravel-livewire-job-batches

# Require Livewire
composer require livewire/livewire

# Install Tailwind CSS
npm install -D tailwindcss@latest postcss@latest autoprefixer@latest

# Create Tailwind CSS configuration file
npx tailwindcss init
Next, we need to make a few more tweaks for Tailwind CSS to work. Let's update our webpack.mix.js first.
  // webpack.mix.js
  mix.js("resources/js/app.js", "public/js")
    .postCss("resources/css/app.css", "public/css", [
+     require("tailwindcss"),
    ]);
Open ./resources/css/app.css and add the Tailwind CSS directives:
@tailwind base;
@tailwind components;
@tailwind utilities;
Next, we want to make sure we include our CSS inside our blade file and include the Livewire directives as well. So open ./resources/views/welcome.blade.php
<!DOCTYPE html>
<html lang="{{ str_replace('_', '-', app()->getLocale()) }}">
<head>
    <meta charset="utf-8">
    <meta name="viewport" content="width=device-width, initial-scale=1">

    <title>File Transfer</title>

    <link href="{{ asset('css/app.css') }}" rel="stylesheet">

    @livewireStyles
</head>
<body>

@livewireScripts
<script src="{{ asset('js/app.js') }}" type="text/javascript"></script>
</body>
</html>
That should do the trick. Run npm run dev to make sure we have a compiled CSS file.
Tailwind UI
I'm a big fan of Tailwind UI because it looks fantastic; it saves me many hours designing and writing markup, which I frankly don't enjoy as much as writing PHP. In this article, you will see screenshots with Tailwind UI components while we progress. The HTML markup in this article, however, will not include any Tailwind UI components. I've made the following sample application in a couple of minutes:
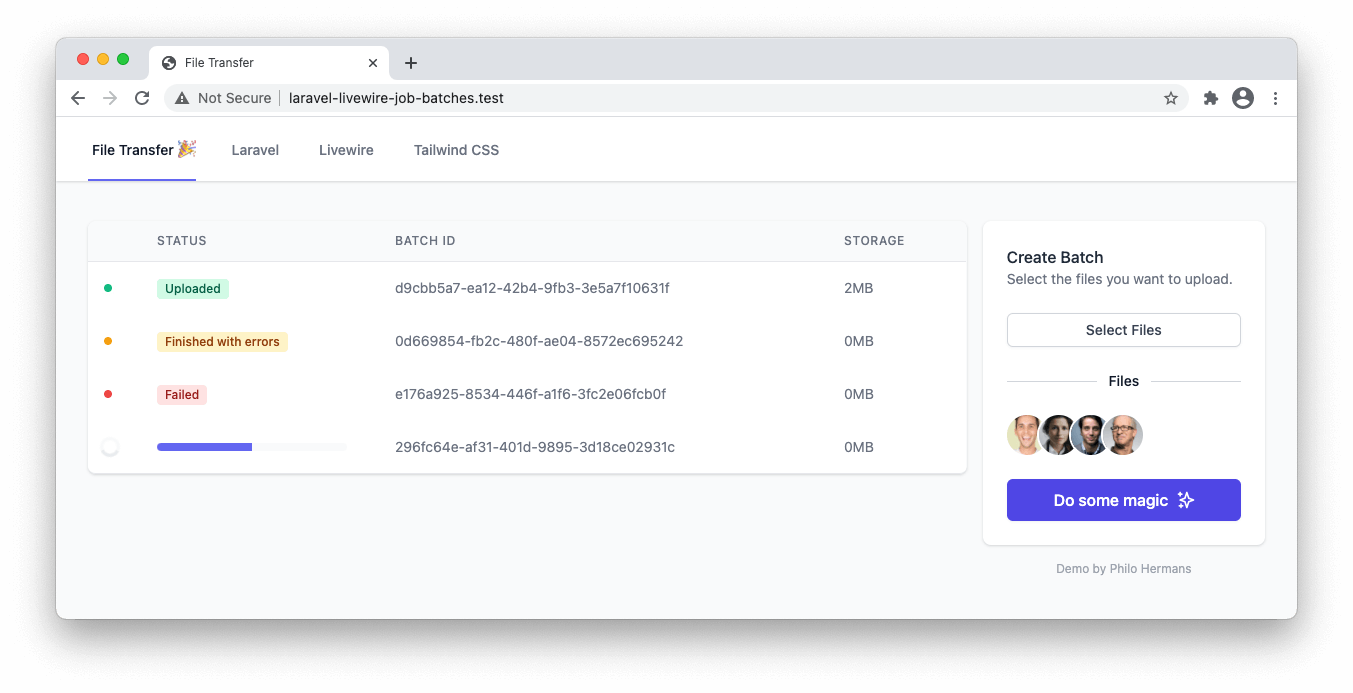
High-level overview
We want to achieve the following:
- As a user, we want to upload one or more images.
- If a user provides an invalid file, we want to show an error message.
- We want to show a preview of the selected images which are valid.
- When the user submits their images successfully, the form should reset.
- When the user submits their images, our application should create a transfer object consisting of multiple transfer file objects.
- An TransferCreated event should occur with a listener, which will generate the batch and store the batch ID on the transfer object to track the progress.
- Create a read-only model for the
job_batchestable so we can eager-load our batches. - Livewire should update the table in real-time to show the transfer status or progress and storage usage.
- Fire the confetti cannon
Create a Livewire Component
Let's kick off by creating our Livewire component:
php artisan livewire:make ManageTransfers

COMPONENT CREATED  🤙

CLASS: app/Http/Livewire/ManageTransfers.php
VIEW:  resources/views/livewire/manage-transfers.blade.php
Let's move our HTML into the manage-transfers.blade.php file.
<div>
<table>
<thead>
<tr>
<th> </th>
<th>Status</th>
<th>Batch ID</th>
<th>Storage</th>
</tr>
</thead>
<tbody>
<tr>
<td>√</td>
<td>Uploaded</td>
<td>d9cbb5a7-ea12-42b4-9fb3-3e5a7f10631f</td>
<td>2MB</td>
</tr>
<tr>
<td>X</td>
<td>Finished with errors</td>
<td>0d669854-fb2c-480f-ae04-8572ec695242</td>
<td>0MB</td>
</tr>
<tr>
<td>!!</td>
<td>Failed</td>
<td>e176a925-8534-446f-a1f6-3fc2e06fcb0f</td>
<td>0MB</td>
</tr>
<tr>
<td>
<svg
xmlns="http://www.w3.org/2000/svg" fill="none" viewBox="0 0 24 24">
<circle
stroke-width="4"></circle>
<path
d="M4 12a8 8 0 018-8V0C5.373 0 0 5.373 0 12h4zm2 5.291A7.962 7.962 0 014 12H0c0 3.042 1.135 5.824 3 7.938l3-2.647z"></path>
</svg>
</td>
<td>
<div class="flex h-2 overflow-hidden rounded bg-gray-50">
<div style="transform: scale({{ 50 / 100 }}, 1)"
class="bg-indigo-500 transition-transform origin-left duration-200 ease-in-out w-full shadow-none flex flex-col"></div>
</div>
</td>
<td>
296fc64e-af31-401d-9895-3d18ce02931c
</td>
<td>
0MB
</td>
</tr>
</tbody>
</table>
<div>
<h3>Create Batch</h3>
<p>Select the files you want to upload.</p>
<div>
<input id="files" name="files" type="file" multiple>
</div>
<div>
Files
</div>
<div>
<img src="#" alt="">
<img src="#" alt="">
<img src="#" alt="">
</div>
<div>
<button type="button">
Do some magic
<svg
xmlns="http://www.w3.org/2000/svg">
<path stroke-linecap="round" stroke-linejoin="round" stroke-width="2"
d="M5 3v4M3 5h4M6 17v4m-2-2h4m5-16l2.286 6.857L21 12l-5.714 2.143L13 21l-2.286-6.857L5 12l5.714-2.143L13 3z"></path>
</svg>
</button>
</div>
</div>
</div>Also, add the @livewire directive to welcome.blade.php so the component will show up.
<body>
@livewire('manage-transfers')
Uploading files with Livewire
Livewire made uploading files a breeze! It's pretty crazy how simple it is to get this to work.

Livewire will make a POST request to the /livewire/upload-file endpoint and return the temporary filenames behind the scenes. The Livewire browser client will make a POST request to the Livewire component, which returns the HTML and updates the DOM to show the image previews.
We will start by defining a model for our file upload element. In this case, let's go with pendingFiles as this model will hold all the files a user selects but are not yet processed.
<input id="files" wire:model="pendingFiles" type="file" multiple>Next, head over to the associated Livewire class for this component (app/Http/Livewire/ManageTransfers.php) and wire this up (pun intended).
<?php

namespace App\Http\Livewire;

use Livewire\Component;
use Livewire\WithFileUploads;

class ManageTransfers extends Component
{
    use WithFileUploads;

    public $pendingFiles = [];

    public function render()
    {
        return view('livewire.manage-transfers');
    }
}
To work with file uploads, you need to include the `Livewire\WithFileUploads` trait. This trait will consist of the necessary methods to process files uploaded via this component.
Tip: Watch out when typed public properties in Livewire components. Livewire will, in some cases, throw an exception if the property is not a string, array, irritable value since it doesn't know what to do. For example:
// Using array as typed property
public array $pendingFiles = [];

// Will throw a TypeError when you try to upload a file
TypeError Cannot assign string to property App\Http\Livewire\ManageTransfers::$pendingFiles of type array
Back to the Livewire Magic. We've added a couple of lines of code, and our upload already works. To verify this, let's quickly add some temporary preview images:
<div>
    @forelse($pendingFiles as $pendingFile)
    <img src="{{ $pendingFile->temporaryUrl() }}"
         alt="">
    @empty
    <p>No files selected</p>
    @endforelse
</div>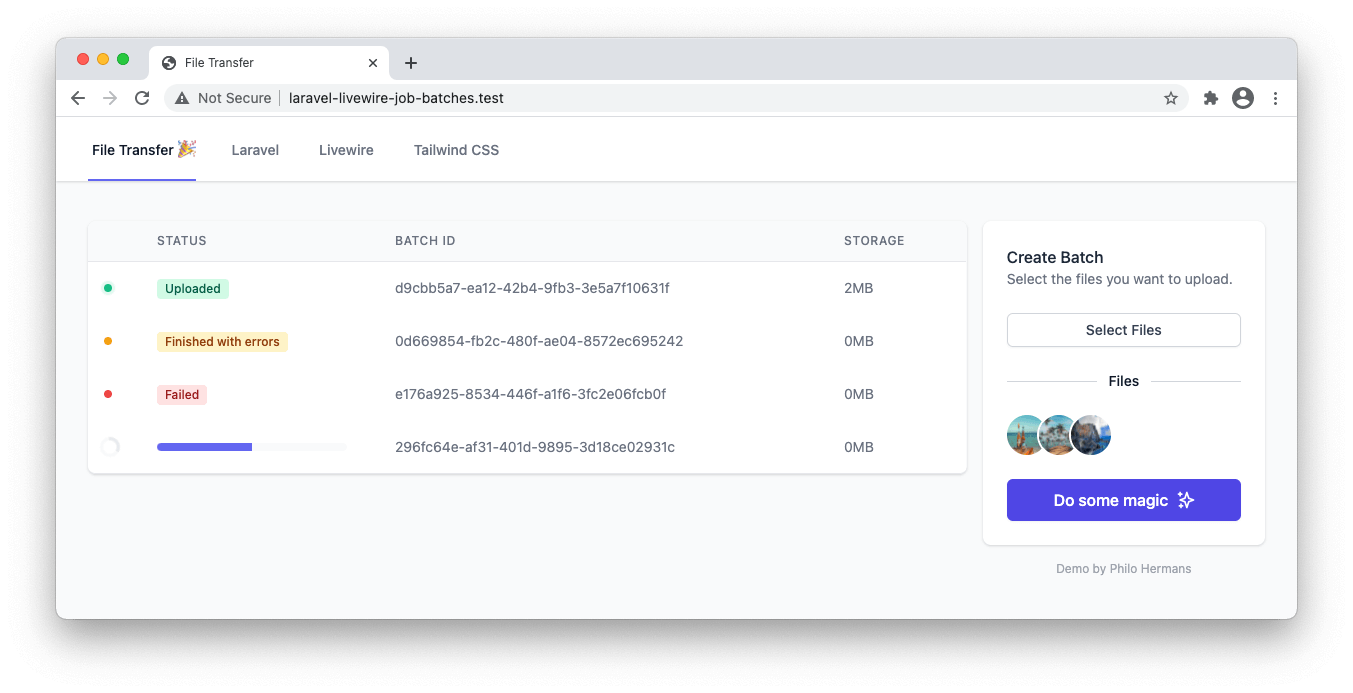
Now give it a try, select a couple of images and watch the magic. Crazy right? So how does this work? Well, Livewire process all the selected files and place these files inside a private temporary directory.
Livewire keeps track of all our uploads. The $pendingFiles property will return an array of Livewire\TemporaryUploadedFile objects. The temporaryUrl method will return a signed route to make the uploaded file available. For security purposes, this temporary URL will only work for approved file extensions. So if you would upload a zip file, this will not work.
If you want to change this default behavior, you can adjust the livewire.php configuration file. You need to run the following command to publish the configuration file:
php artisan livewire:publish --configIf you open this file, you can scroll down to the 'Livewire Temporary File Uploads Endpoint Configuration' section and tweak the configuration to your liking:
'temporary_file_upload' => [
    'disk' => null,
    'rules' => null,
    'directory' => null,
    'middleware' => null,
    'preview_mimes' => [
        'png', 'gif', 'bmp', 'svg', 'wav', 'mp4',
        'mov', 'avi', 'wmv', 'mp3', 'm4a',
        'jpg', 'jpeg', 'mpga', 'webp', 'wma',
    ],
    'max_upload_time' => 5,
],
Please consider that although Livewire ships with some sensible defaults like a 12MB upload limit and a throttle, it is possible for someone to fill up your disk space if this person wants to. So some additional security wouldn't hurt. You could, for example, limit the number of temporary files per user.
File validation with Livewire
By default, Livewire implements the required, file, and max:12288 rules for any temporary file uploads. To add our validation, we can provide our rules to the validate method.
Let's create a public method named initiateTransfer() and some of our own validation rules (file must be an image and a max size of 5MB), wire this up to the button so a user can submit the selected files for transfer.
public function initiateTransfer()
{
    $this->validate([
        'pendingFiles.*' => ['image', 'max:5120']
    ]);
}
<div>
    <button wire:click="initiateTransfer" type="button">
        Do some magic
    </button>
</div>
If you upload a too large image for example, you won't see errors just yet. So let's add this to our view:
<div>
    @error('pendingFiles.*')
    {{ $message }}
    @enderror
</div>
If I would upload a file that is 70MB, for example, it will fail immediately because it does not pass the initial validation rule (12MB max) defined in the livewire.php configuration.
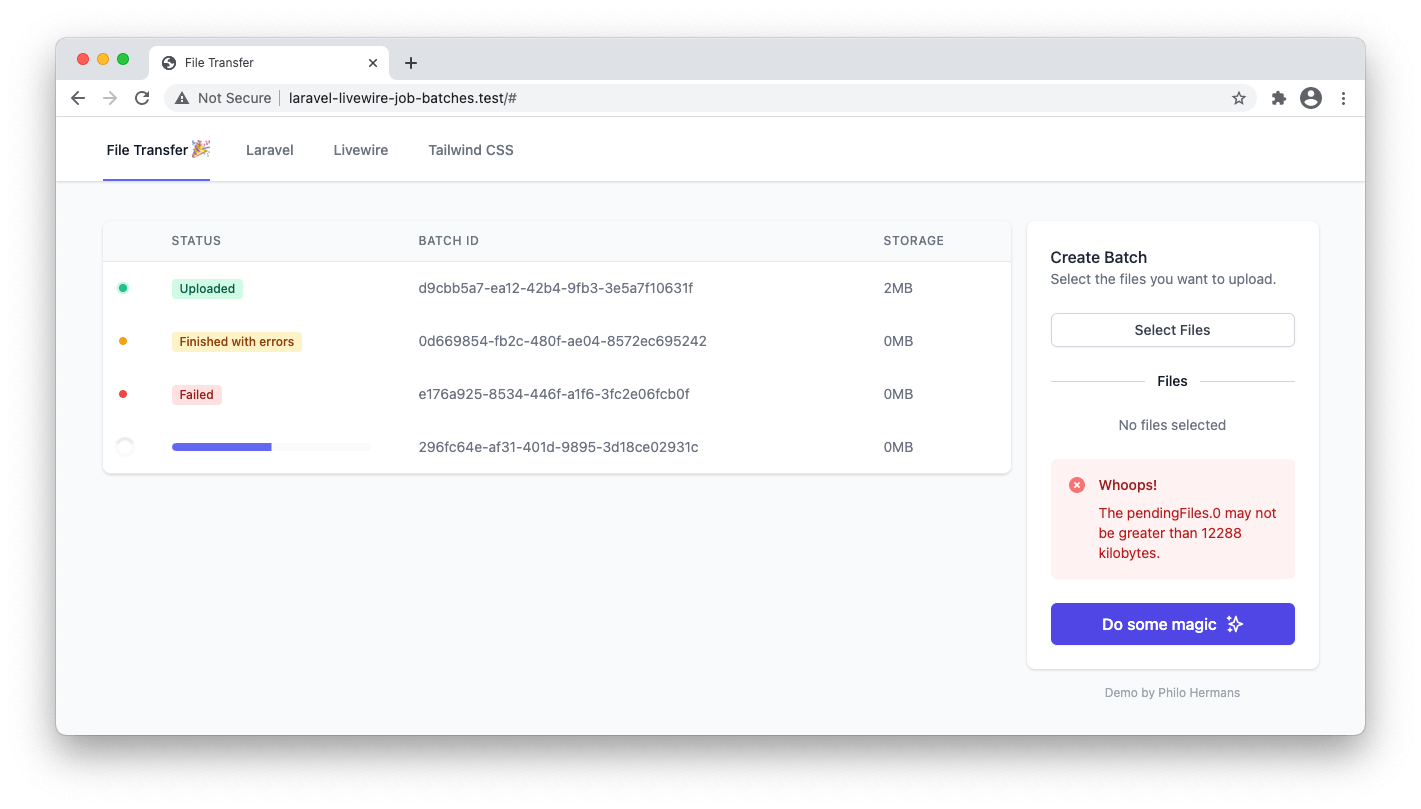
If we would upload a 6.7MB image, you will see the temporary preview but no error. The error will only show after the validation executes, so if you click the 'Do some magic' button, you should see the error stating the file cannot exceed 5MB.
Eloquent models and database migrations
To track the status of our batch, we need to attach our batch to something. For example, you might want to attach these files to a document, project; you name it. You could also show the entire contents of the `job_batches` table, but I don't think that is a likely use case.
Job Batches Table
Before we can dispatch batches, we need to run an artisan command to generate the database table that Laravel will use to persist data related to our batch. So run the following command:
php artisan queue:batches-table
Migration created successfully!
The job_batches table contains the following Information:
- The name of your job.
- The total amount of jobs given batch has.
- The total amount of pending jobs waiting to be processed by the queue worker.
- The total amount of jobs that failed to be processed by the queue worker.
- The ID's of the failed jobs, this is a reference to the
failed_jobstable. - Any options defined like
then,catchorfinally. - The timestamp when the batch was canceled.
- The timestamp when the batch was created.
- The timestamp when the queue worker finished processing all the jobs for a given batch.
We will use some of this data in a future step to, for example, show the progress of a particular batch.
User model
I want to demonstrate how to broadcast privately, so only the logged-in user will see the transfer jobs and the real-time progress. Laravel already ships with a user model, so the only thing you need to do is open the DatabaseSeeder and uncomment the User factory.
Scaffolding the UI for authentication etc. is out of scope for this article. Still, I'd like to share an alternative when working locally and quickly login into any account without providing any credentials.
Open your routes/web.php and add the following:
Route::get('dev-login', function () {
    abort_unless(app()->environment('local'), 403);

    auth()->loginUsingId(App\User::first());

    return redirect()->to('/');
});
This will only work locally due to the abort_unless function which will throw a 403 error if the environment is not equal to local. I'm using the auth() helper to sign in to the first user in the database.
Transfer and File Model
We will use an Eloquent model to track all the files. As previously mentioned, you could see this as a project (or email or tweet with one or more attachments), and you want to upload and associated specific files to this project.
So let's create a model and migration for both the transfer and the file.
php artisan make:model Transfer --migration
Model created successfully.
Created Migration: 2021_02_04_174530_create_transfers_table

php artisan make:model TransferFile --migration
Model created successfully.
Created Migration: 2021_02_04_174548_create_transfer_files_table
For our transfers table, we only need to add one additional field, which is the batch_id:
Schema::create('transfers', function (Blueprint $table) {
    $table->id();
    $table->foreignId('user_id');
    $table->foreignUuid('batch_id')->nullable();
    $table->timestamps();
});
The transfer_files table will contain the file path and the file size:
Schema::create('transfer_files', function (Blueprint $table) {
    $table->id();
    $table->foreignId('transfer_id');
    $table->string('disk');
    $table->string('path');
    $table->unsignedInteger('size');
    $table->timestamps();
});
While we are here, let's set up the relationship between them and define the fillable fields.
<?php

namespace App\Models;

use Illuminate\Database\Eloquent\Model;
use Illuminate\Database\Eloquent\Relations\HasMany;

class Transfer extends Model
{
    /**
     * The attributes that are mass assignable.
     *
     * @var string[]
     */
    protected $fillable = [
        'batch_id',
    ];

    public function files(): HasMany
    {
        return $this->hasMany(TransferFile::class);
    }
}
<?php
namespace App\Models;
use Illuminate\Database\Eloquent\Model;
class TransferFile extends Model
{
/**
* The attributes that are mass assignable.
*
* @var string[]
*/
protected $fillable = [
'disk',
'path',
'size'
];
/**
* The attributes that should be cast.
*
* @var array
*/
protected $casts = [
'disk' => 'string',
'path' => 'string',
'size' => 'integer'
];
public function transfer(): BelongsTo
{
return $this->belongsTo(Transfer::class);
}
}Persisting data to the database
Run php artisan migrate to execute all the migrations if you haven't already. We can now store the pending files that have passed validation.
public function initiateTransfer()
{
    $this->validate([
        'pendingFiles.*' => ['image', 'max:5120'],
    ]);

    // This code will not execute if the validation fails
    $transfer = auth()->user()->transfers()->create();
    $transfer->files()->saveMany(
        collect($this->pendingFiles)
            ->map(function (TemporaryUploadedFile $pendingFile) {
                return new TransferFile([
                    'disk' => $pendingFile->disk,
                    'path' => $pendingFile->getRealPath(),
                    'size' => $pendingFile->getSize(),
                ]);
            })
    );
}
When you select four images and click the magic button, you will see one new database entry in the transfers table and four entries in the transfer_files table.
Now let's reset the $pendingFiles property to an empty array to reset the form and finally event (we will create this class in the next step).
public function initiateTransfer()
{
    $this->validate([
        'pendingFiles.*' => ['image', 'max:5120'],
    ]);

    $transfer = auth()->user()->transfers()->create();
    $transfer->files()->saveMany(
      // ...
    );

    $this->pendingFiles = [];

    LocalTransferCreated::dispatch($transfer);
}
Dispatch LocalTransferCreated event
Now we have all our data stored, we can dispatch an event that we can listen for in future steps. Let's create the event we referenced in the initiateTransfer method above:
php artisan make:event LocalTransferCreated
Event created successfully.
We eventually want to update our table every time the LocalTransferCreated event is dispatched. To do this, we will use Laravel Echo. We will talk about it in a future step, but since we are here, let's make sure our event implements the ShouldBroadcast interface, so Laravel knows we want to broadcast the event.
<?php

namespace App\Events;

use App\Models\Transfer;
use Illuminate\Broadcasting\InteractsWithSockets;
use Illuminate\Broadcasting\PrivateChannel;
use Illuminate\Contracts\Broadcasting\ShouldBroadcast;
use Illuminate\Foundation\Events\Dispatchable;
use Illuminate\Queue\SerializesModels;

class LocalTransferCreated implements ShouldBroadcast
{
    use Dispatchable, InteractsWithSockets, SerializesModels;

    public function __construct(private Transfer $transfer)
    {
    }

    public function getTransfer(): Transfer
    {
        return $this->transfer;
    }

    public function broadcastOn()
    {
        return new PrivateChannel('channel-name');
    }
}
Create and assign listener
Let's create a new listener that will listen to the LocalTransferCreated event and dispatch our batch.
php artisan make:listener CreateTransferBatch
Listener created successfully.
Next, add the mapping to our EventServiceProvider to instruct Laravel to call our CreateTransferBatch when the LocalTransferCreated event is dispatched:
<?php

namespace App\Providers;

use App\Events\LocalTransferCreated;
use App\Listeners\CreateTransferBatch;
use Illuminate\Foundation\Support\Providers\EventServiceProvider as ServiceProvider;

class EventServiceProvider extends ServiceProvider
{
    /**
     * The event listener mappings for the application.
     *
     * @var array
     */
    protected $listen = [
        LocalTransferCreated::class => [
            CreateTransferBatch::class
        ]
    ];
}
Create our transfer job
Before we can create our batch, we need to have a job to pass to our batch. So let's create one:
php artisan make:job TransferLocalFileToCloud
Job created successfully.
Now, this is a relatively simple job. We take the local file, upload it to our cloud storage, update the database record by changing the disk to `s3`, and the path to generated path containing a unique filename returned by the `put` method. Finally, we clean up by removing the file from our local storage.
To make your job batchable, you need to add the `Batchable` trait; otherwise, you will get the following exception:
Call to undefined method App\Jobs\TransferLocalFileToCloud::withBatchId()Depending on your cloud storage provider, you may need to require the adapter, e.g. composer require "league/flysystem-aws-s3-v3 ~1.0"
<?php

namespace App\Jobs;

use App\Models\TransferFile;
use Illuminate\Bus\Batchable;
use Illuminate\Bus\Queueable;
use Illuminate\Contracts\Queue\ShouldQueue;
use Illuminate\Foundation\Bus\Dispatchable;
use Illuminate\Http\File;
use Illuminate\Queue\InteractsWithQueue;
use Illuminate\Queue\SerializesModels;
use Illuminate\Support\Facades\Storage;

class TransferLocalFileToCloud implements ShouldQueue
{
    use Batchable, Dispatchable, InteractsWithQueue, Queueable, SerializesModels;

    public function __construct(private TransferFile $file)
    {
    }

    public function handle()
    {
        $cloudPath = Storage::disk('s3')->put('images', new File($localPath = $this->file->path));

        $this->file->update([
            'disk' => 's3',
            'path' => $cloudPath,
        ]);

        Storage::delete(explode('/app/', $localPath)[1]);

        // Dispatch event
    }
}
Since we want to update the interface in real-time, we need to dispatch an event every time a file is transferred. Let's create a new event:
php artisan make:event FileTransferredToCloud
Event created successfully.
Let's take the Transfer model as our event parameter and make sure the event implements the ShouldBroadcastNow interface. We want to broadcast this event straight away, or else it will end up at the bottom of the queue backlog, causing this event to trigger when the entire batch is already done. Given we want to show the progress in real-time, we need this broadcast to happen in real-time.
<?php

namespace App\Events;

use App\Models\TransferFile;
use Illuminate\Broadcasting\InteractsWithSockets;
use Illuminate\Broadcasting\PrivateChannel;
use Illuminate\Contracts\Broadcasting\ShouldBroadcastNow;
use Illuminate\Foundation\Events\Dispatchable;
use Illuminate\Queue\SerializesModels;

class FileTransferredToCloud implements ShouldBroadcastNow
{
    use Dispatchable, InteractsWithSockets, SerializesModels;

    public function __construct(private TransferFile $file)
    {
    }

    public function broadcastOn()
    {
        return new PrivateChannel('channel-name');
    }
}
Now dispatch the event from our TransferLocalFileToCloud job:
public function handle()
{
    // ...

    FileTransferredToCloud::dispatch($this->file);
}
Create job batch
Time to create our job batch inside our CreateTransferBatch listener. We can use the mapInto collection method to generate a job for each file quickly.
<?php

namespace App\Listeners;

use App\Events\LocalTransferCreated;

class CreateTransferBatch
{
    public function handle(LocalTransferCreated $event)
    {
        $jobs = $event->getTransfer()->files->mapInto(TransferLocalFileToCloud::class);
    }
}
Now we can use the Batch facade to dispatch all these jobs in a single go.
public function handle(LocalTransferCreated $event)
{
    $jobs = $event->getTransfer()->files->mapInto(TransferLocalFileToCloud::class);
    $batch = Bus::batch($jobs)->dispatch();
}
Feel free to give it a try! The batch should transfer your files to your cloud storage. You can verify this by taking a look at your job_batches table. Here you should see a new entry and the number of jobs processed.
Saving & configuring our batch
The whole point of our batch is that we want to show the progress to our users. So let's start by attaching the batch ID to our Transfer model.
public function handle(LocalTransferCreated $event)
{
    $jobs = $event->getTransfer()->files->mapInto(TransferLocalFileToCloud::class);
    $batch = Bus::batch($jobs)->dispatch();

    $event->getTransfer()->update([
        'batch_id' => $batch->id
    ]);
}
Next, we want to fire an event when all of our jobs are processed. The Batch facade provides a couple of methods you can use to achieve this.
$batch = Bus::batch($jobs)
    ->then(function (Batch $batch) {
        // All jobs completed successfully
    })->catch(function (Batch $batch, Throwable $e) {
        // First batch job failure detected
    })->finally(function (Batch $batch) {
        // The batch has finished executing
    })->dispatch();
In our case, we will only use the finally method to fire the TransferCompleted event. So let's create this event first.
php artisan make:event TransferCompleted
Event created successfully.
This event will accept the Transfer model as the parameter and implements the ShouldBroadcast interface as we did earlier.
<?php

namespace App\Events;

use App\Models\Transfer;
use Illuminate\Broadcasting\InteractsWithSockets;
use Illuminate\Broadcasting\PrivateChannel;
use Illuminate\Contracts\Broadcasting\ShouldBroadcast;
use Illuminate\Foundation\Events\Dispatchable;
use Illuminate\Queue\SerializesModels;

class TransferCompleted implements ShouldBroadcast
{
    use Dispatchable, InteractsWithSockets, SerializesModels;

    public function __construct(private Transfer $transfer)
    {
    }

    public function broadcastOn()
    {
        return new PrivateChannel('channel-name');
    }
}
Next, we will add it to the finally closure.
class CreateTransferBatch
{
    public function handle(LocalTransferCreated $event)
    {
        $transfer = $event->getTransfer();
        $jobs = $transfer->files->mapInto(TransferLocalFileToCloud::class);

        $batch = Bus::batch($jobs)
            ->finally(function () use ($transfer) {
                TransferCompleted::dispatch($transfer);
            })->dispatch();

        $event->getTransfer()->update([
            'batch_id' => $batch->id
        ]);
    }
}
I've also assigned a variable to the transfer model to pass the model instead of the entire event. Laravel will serialize the closure and store it in the options column of the job_batches table.
If you want, you can give the entire flow another go and use php artisan queue work to see your processed jobs.
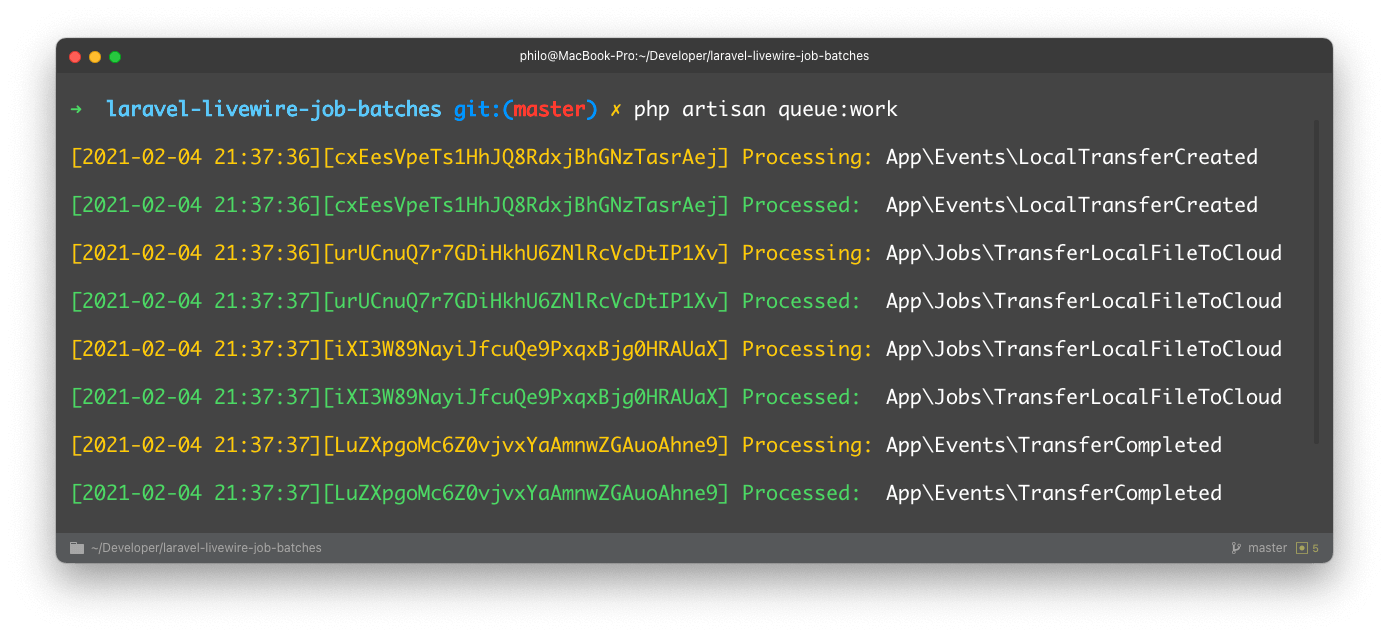
Pretty cool, right?
Listing our transfers
We can now make our static table dynamic by listing all the transfers. So head back to your Livewire component class and pass an Eloquent collection containing our Transfer models to our view.
public function render()
{
    return view('livewire.manage-transfers', [
        'transfers' => auth()->user()->transfers
    ]);
}
Let's open our manage-transfers.blade.php and add a @forelse to our table.
<tbody>
@forelse($transfers as $transfer)
<tr>
    <td>
        {{-- status icon --}}
    </td>
    <td>
        {{-- status text --}}
    </td>
    <td>
        {{ $transfer->batch_id }}
    </td>
    <td>
        {{-- combined file size of transfer files --}}
    </td>
</tr>
@empty
<tr>
    <td colspan="4">
        You have no transfers. Create a batch on the right 👉🏻
    </td>
</tr>
@endforelse
</tbody>
We need to show our job status and calculate the combined size of all the transfer files. Now Laravel ships with a method to lookup batches by their ID: Bus::findBatch($batchId);. This method will use the `DatabaseBatchRepository` behind the scenes to fetch the data from the database and transform the data into a \Illuminate\Bus\Batch object.
The findBatch method works perfectly, but I would love to use Eloquent instead to eager load all the batches, perform query scopes, etc. So let's create a ready-only model for our batches.
Laravel is responsible for maintaining the data integrity of our job_batches table, and I want to keep it that way, so that's why I like the model to be read-only.
Packagist to the rescue. If you do a quick search for read-only, you will see the following package show up. This package will introduce a trait to make models read-only. So let's install it:
composer require michaelachrisco/readonlyNext, we also want to create our model:
php artisan make:model JobBatchLet's start by adding the read-only trait to our model, so our model will throw an exception if you call a method like create, save, delete, etc.
<?php

namespace App\Models;

use Illuminate\Database\Eloquent\Factories\HasFactory;
use Illuminate\Database\Eloquent\Model;
use MichaelAChrisco\ReadOnly\ReadOnlyTrait;

class JobBatch extends Model
{
    use ReadOnlyTrait;
}
If we take a quick look at the job_batches table, you can see each batch has a UUID instead of an incrementing integer, and it also does not have the updated_at timestamp. So let's update our model:
class JobBatch extends Model
{
    use ReadOnlyTrait;

    /**
     * The table associated with the model.
     *
     * @var string
     */
    protected $table = 'job_batches';

    /**
     * The "type" of the primary key ID.
     *
     * @var string
     */
    protected $keyType = 'string';

    /**
     * Indicates if the IDs are auto-incrementing.
     *
     * @var bool
     */
    public $incrementing = false;

    /**
     * Indicates if the model should be timestamped.
     *
     * @var bool
     */
    public $timestamps = false;
}
To make things a bit easier, we can cast the model properties, so we get a Carbon object when we do something like $jobBatch->finished_at or a collection when we do $jobBatch->options:
class JobBatch extends Model
{
    // ....

    /**
     * The attributes that should be cast.
     *
     * @var array
     */
    protected $casts = [
        'options'      => 'collection',
        'failed_jobs'  => 'integer',
        'created_at'   => 'datetime',
        'cancelled_at' => 'datetime',
        'finished_at'  => 'datetime',
    ];
}
Next, we want to re-create some methods that we would typically get from the Illuminate\Bus\Batch object:
- processedJobs: Get the total number of jobs that have been processed by the batch thus far.
- progress: Get the percentage of jobs that have been processed (between 0-100).
- finished: Determine if the batch has finished executing.
- hasFailues: Determine if the batch has job failures.
- canceled: Determine if anything canceled the batch.
We can duplicate most of these methods into our model and adjust the code accordingly to get to data from our model:
class JobBatch extends Model
{
    // ...

    /**
     * Get the total number of jobs that have been processed by the batch thus far.
     *
     * @return int
     */
    public function processedJobs()
    {
        return $this->total_jobs - $this->pending_jobs;
    }

    /**
     * Get the percentage of jobs that have been processed (between 0-100).
     *
     * @return int
     */
    public function progress(): int
    {
        return $this->total_jobs > 0 ? round(($this->processedJobs() / $this->total_jobs) * 100) : 0;
    }

    /**
     * Determine if the batch has pending jobs
     *
     * @return bool
     */
    public function hasPendingJobs(): bool
    {
        return $this->pending_jobs > 0;
    }

    /**
     * Determine if the batch has finished executing.
     *
     * @return bool
     */
    public function finished(): bool
    {
        return !is_null($this->finished_at);
    }

    /**
     * Determine if the batch has job failures.
     *
     * @return bool
     */
    public function hasFailures(): bool
    {
        return $this->failed_jobs > 0;
    }

    /**
     * Determine if all jobs failed.
     *
     * @return bool
     */
    public function failed(): bool
    {
        return $this->failed_jobs === $this->total_jobs;
    }

    /**
     * Determine if the batch has been canceled.
     *
     * @return bool
     */
    public function cancelled(): bool
    {
        return !is_null($this->cancelled_at);
    }
}
We are almost ready to eager-load our job batches. The only thing that remains is defining the relationship. So let's open our Transfer model and add the relationship:
class Transfer extends Model
{
    // ...

    public function jobBatch(): BelongsTo
    {
        return $this->belongsTo(JobBatch::class, 'batch_id');
    }
}
Now we can update our code inside our ManageTransfers Livewire component to eager-load our batches.
class ManageTransfers extends Component
{
    // ...

    public function render()
    {
        return view('livewire.manage-transfers', [
            'transfers' => auth()->user()->transfers()->with('jobBatch')->get(),
        ]);
    }
}
Finally, let's update our HTML to reflect the different job states:
@forelse($transfers as $transfer)
<tr class="bg-white">

    @if(is_null($transfer->jobBatch))

    <td>
        %
    </td>
    <td>
        <div class="flex h-2 overflow-hidden rounded bg-gray-50">
            <div style="transform: scale(0, 1)"
                 class="bg-indigo-500 transition-transform origin-left duration-200 ease-in-out w-full shadow-none flex flex-col"></div>
        </div>
    </td>
    @elseif($transfer->jobBatch->hasPendingJobs())
    <td>
        %
    </td>
    <td>
        <div class="flex h-2 overflow-hidden rounded bg-gray-50">
            <div style="transform: scale({{ $transfer->jobBatch->progress() / 100 }}, 1)"
                 class="bg-indigo-500 transition-transform origin-left duration-200 ease-in-out w-full shadow-none flex flex-col"></div>
        </div>
    </td>

    @elseif($transfer->jobBatch->finished() and $transfer->jobBatch->failed())

    <td>
        X
    </td>
    <td>
        Failed
    </td>

    @elseif($transfer->jobBatch->finished() and $transfer->jobBatch->hasFailures())

    <td>
        !!
    </td>
    <td>
        Finished with errors
    </td>

    @elseif($transfer->jobBatch->finished())

    <td>
        √
    </td>
    <td>
        Uploaded
    </td>
    @endif
    <td>
        {{ $transfer->batch_id }}
    </td>
    <td>
        {{-- combined file size of transfer files --}}
    </td>
</tr>
@empty
<tr>
    <td colspan="4">
        You have no transfers. Create a batch on the right 👉🏻
    </td>
</tr>
@endforelse
Great! Things are starting to take shape. Let's finish our table view by showing the combined size of all the files. We could do this by eager-loading the files and summing up the total size:
return view('livewire.manage-transfers', [
    'transfers' => auth()->user()->transfers()->with('jobBatch', 'files')->get(),
]);

// $transfer->files->sum('size');
But that would load all the file models; although it works, we can optimize this a bit by letting Eloquent calculate the sum via SQL.
return view('livewire.manage-transfers', [
    'transfers' => auth()->user()->transfers()->with('jobBatch')->withSum('files', 'size')->get(),
]);

// $transfer->files_sum_size
Quite a handy little helper to improve the performance of your application. Now our view is ready, and you should have something like this:
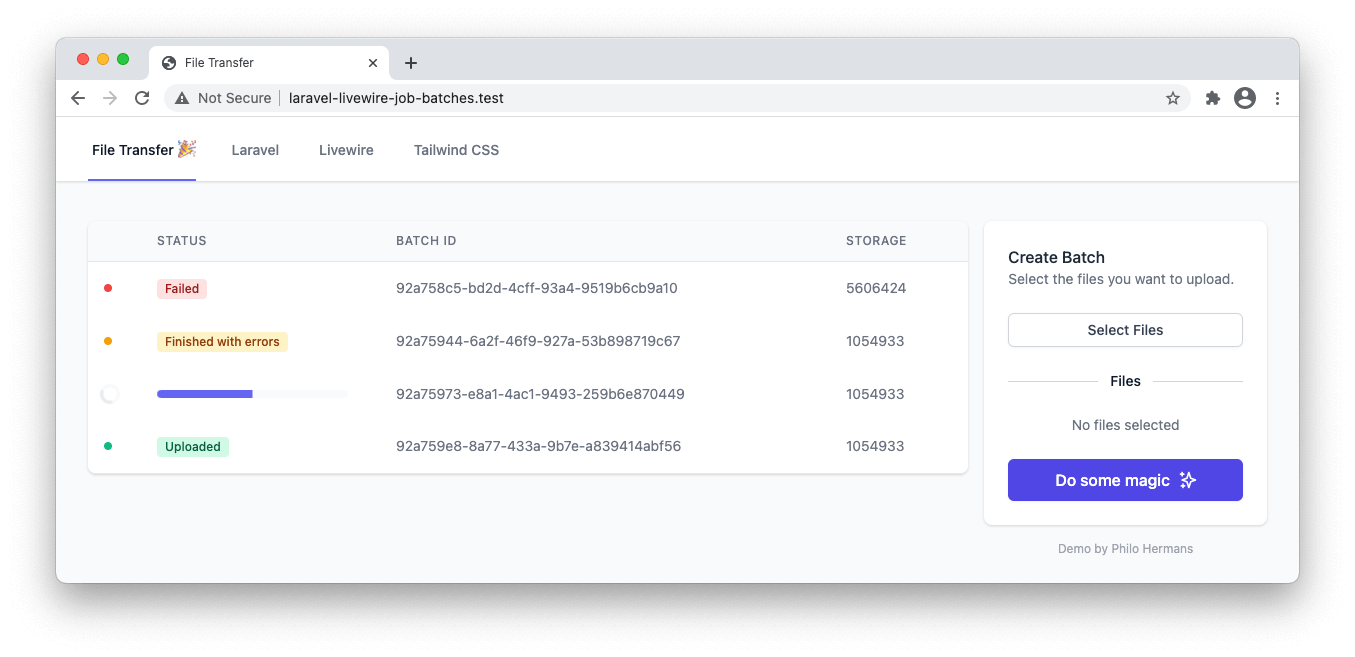
If you want to see the different states, you can fake this by adjusting the job_batches entries. For example, set the failed_jobs or pending_jobs column to 1.
Real-time progress using Laravel Echo
The moment everyone has been waiting for, showing transfer progress and results to our users in real-time. We are going to make this happen by using Laravel Echo and Livewire. So before we move on, let's install the Laravel Echo Javascript library.
npm install --save-dev laravel-echo pusher-jsNext, you can uncomment the following code in your bootstrap.js file:
import Echo from 'laravel-echo';

window.Pusher = require('pusher-js');

window.Echo = new Echo({
    broadcaster: 'pusher',
    key: process.env.MIX_PUSHER_APP_KEY,
    cluster: process.env.MIX_PUSHER_APP_CLUSTER,
    forceTLS: true
});
In this example, I will use Pusher as our broadcaster. You can sign-up for a free account and get your account credentials. You need to add these in your .env file.
BROADCAST_DRIVER=pusher
PUSHER_APP_ID=10000
PUSHER_APP_KEY=h28f720sd6v5a02
PUSHER_APP_SECRET=jh8s02017cx0add
PUSHER_APP_CLUSTER=eu
Run npm run dev once you have the npm package installed and the environment variables defined. Next, we also need to require the Pusher SDK:
composer require pusher/pusher-php-server "~4.0"Channel configuration
We have three events that are broadcasting:
- LocalTransferCreated
- LocalTransferCreated
- TransferCompleted
These events are broadcasting to a private channel. Let's return a channel name that includes the user id (owner) of a given transfer model.
In most cases, you would use private channels, but if you don't need any authentication, you can return an Illuminate\Broadcasting\Channel object instead.
class FileTransferredToCloud implements ShouldBroadcastNow
{
    // ...

    public function broadcastOn()
    {
        return new PrivateChannel("notifications.{$this->file->transfer->user_id}");
    }
}


class LocalTransferCreated implements ShouldBroadcast
{
    // ...

    public function broadcastOn()
    {
        return new PrivateChannel("notifications.{$this->transfer->user_id}");
    }
}

class TransferCompleted implements ShouldBroadcast
{
    // ...
    public function broadcastOn()
    {
        return new PrivateChannel("notifications.{$this->transfer->user_id}");
    }
}
Channel authorization
Laravel Echo will request a particular endpoint to verify if you have access to a private channel. This endpoint doesn't exist by default because the BroadcastServiceProvider is disabled by default. Open your app.php and enable App\Providers\BroadcastServiceProvider::class
Next we can define the authorization in the routes/channels.php file.
Broadcast::channel('notifications.{channelUser}', function ($authUser, \App\Models\User $channelUser) {
    return $authUser->id === $channelUser->id;
});
The closure has two values; the first value is the current logged in user, the second value is the broadcast user id, which is automatically resolved when you type-hint the closure just like when you use routes.
Integrating Laravel Livewire with Laravel Echo
We can now configure our Livewire component and instruct it to refresh itself when we receive a new event from Pusher. Livewire has native support for Laravel Echo, so this only requires a couple of lines of code. Open the ManageTransfers component and create a new getListeners() method.
public function getListeners()
{
    return [];
}
This method should return a key-value array with the key being the event to listen to and the value being the method to trigger when the event occurs.
In our case, we want to refresh the entire component. The cool thing about Livewire is that it knows which elements have changed and only updates the DOM for those elements. This means CSS animations will work, and we will see our progress bar update with a cool animation.
public function getListeners()
{
    $userId = auth()->id();

    return [
        "echo-private:notifications.{$userId},FileTransferredToCloud" => '$refresh',
    ];
}
If you use Laravel Echo, you need to prefix your notification with echo-private so Livewire knows it needs to work together with Laravel Echo. Next, we provide it our private channel name notifications.{$userId} followed by the event we want to listen to, in this case, FileTransferredToCloud. We don't have any specific method we want to trigger; we just want to refresh the component by passing it $refresh.
That's it! Go and give it a try and watch the magic happen.
Confetti bonus
What's real-time progress without some confetti? Exactly, absolutely nothing! Let's give it a blast of confetti when it's done with the transfer.
Let's install our confetti cannon:
npm install --save canvas-confettiOpen resources/app.js and use the Livewire.on() function to listen for a confetti event:
import confetti from "canvas-confetti";

Livewire.on('confetti', () => {
    confetti({
        particleCount: 80,
        spread: 200,
        origin: {y: 0.6}
    });
})
Next, head back to the Livewire component and register a new listener.
public function getListeners()
{
    $userId = auth()->id();

    return [
        "echo-private:notifications.{$userId},FileTransferredToCloud" => '$refresh',
        "echo-private:notifications.{$userId},TransferCompleted" => 'fireConfettiCannon',
    ];
}
Next, create a new method called fireConfettiCannon and use the emit helper to emit the confetti event:
public function fireConfettiCannon()
{
    $this->emit('confetti');
}
That's a wrap! 🎉 I'd love to hear how you have used this technique to show real-time progress (and maybe some confetti) to your customers. Drop me a tweet @Philo01 and talk! 🙌🏼

Wire Elements Pro - Expertly crafted Livewire components 🚀
Beautiful components crafted with Livewire. Launching soon, be sure to subscribe.
I'm thinking about releasing a premium video course in the near future (if enough people are interested) where I will show you how to build a real-world application from start to finish using Laravel, Livewire, and Tailwind CSS. I will be covering everything, from registering a domain, setting up a server, writing tests, you name it. Subscribe if you are interested and want to be notified, and you might also get access for free as I will be doing a give away when the course launches.