
Dealing with modals is something I always found time-consuming. A front-end library was often required, which meant exposing APIs to consume while keeping the state in sync. This is now in the past. Livewire has made it super easy to write SPA-like applications with little to no Javascript.
While building Unlock, I was exploring different ways to build modals with Livewire. I eventually found an approach that works very well! I shared a short video about this on Twitter, and many people were interested in how to do this.
I’ve been working on a dynamic @LaravelLivewire modal component for Unlock. I don’t like breaking creation flows (e.g., require policy creation on a different page). So my goal was to support child modals while preserving state and with smooth transitions. Laravel ❤️ Livewire pic.twitter.com/GciN54fibY
— Philo Hermans (@Philo01) March 21, 2021
So I decided to make a package so everyone can enjoy unlimited modals. This article will show you how to use this package in your applications for the best result. Fair warning, you might even start to enjoy building modals.

Wire Elements Pro - Expertly crafted Livewire components 🚀
Getting started
You can follow along with your existing application as long as it is running PHP 7.4 or higher. Alternatively, you can start with a fresh install of Laravel:
composer create-project laravel/laravel example-appNext, you will need to include the modal package via composer as well:
composer require wire-elements/modalOnce the package is installed, it will automatically be registered in your Laravel application. There is some Javascript involved, but that's all taken care of.
The modal is built with Tailwind CSS. If you are using a different framework, you will need to adjust the modal's markup to work. To edit the markup of the modal, you will need to publish the Blade file:
php artisan vendor:publish --tag=livewire-ui-modal-viewsWe are almost done with the installation. Open your layout Blade file or welcome.blade.php if you are using a fresh Laravel installation. Next, add Alpine and the Livewire directives.
<html>
    <head>
        <!-- Styles -->
        <link href="https://unpkg.com/tailwindcss@^2/dist/tailwind.min.css" rel="stylesheet">
        @livewireStyles

        <!-- Scripts -->
        <script defer src="https://unpkg.com/alpinejs@3.x.x/dist/cdn.min.js"></script>
    </head>
<body>
    <!-- Your application content -->

    @livewire('livewire-ui-modal')
    @livewireScripts
</body>
</html>
That wasn't too bad. Let's move on to the fun part!
Tip: If you want to make changes to the Javascript you can publish the uncompressed Javascript as well. Or you can require the Javascript so it's included in your app.js. You can disable the Javascript from being loaded by disabling this in the configuration file.
php artisan vendor:publish --tag=livewire-ui-modal-config /*
|--------------------------------------------------------
| Include JS
|--------------------------------------------------------
|
| Livewire UI will inject the required Javascript in your blade template.
| If you want to bundle the required Javascript you can set this to false
| and add `require('vendor/livewire-ui/modal/resources/js/modal');`
| to your script bundler like webpack.
|
*/
'include_js' => false,When disabled, you can add the following to your app.js:
// Reference from published scripts
require('./vendor/livewire-ui/modal');


// Reference from vendor
require('../../vendor/livewire-ui/modal/resources/js/modal');How to create your first modal
The easiest way to create a Livewire modal is by creating a regular Livewire component. Let's, for example, create a new component called. HelloWorld:
php artisan livewire:make HelloWorld

COMPONENT CREATED  🤙

CLASS: app/Http/Livewire/HelloWorld.php
VIEW:  resources/views/livewire/hello-world.blade.php
Open HelloWorld.php and extend the component with LivewireUI\Modal\ModalComponent instead of the default Livewire\Component:
<?php

namespace App\Http\Livewire;

use LivewireUI\Modal\ModalComponent;

class HelloWorld extends ModalComponent
{
    public function render()
    {
        return view('livewire.hello-world');
    }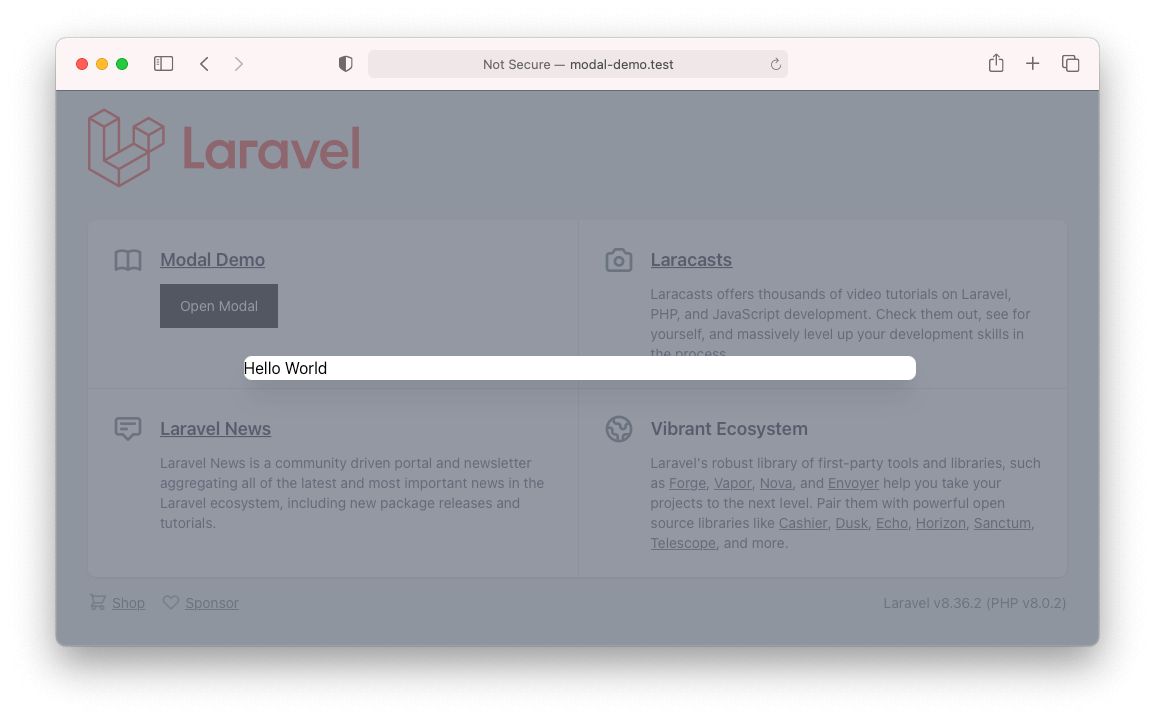
}Next, we need some content so we can see the modal is working, open resources/views/livewire/hello-world.blade.php and enter the text Hello World:
<div>
    Hello World
</div>That's it. You've just created your first modal. Simple, right?
How to open your modal
Now chances are your screen is empty, and you don't see any modal. This is because the Livewire UI modal package generates modals only when they are requested. You can interact with the 'core' modal via events.
To open the modal we've created in the step above; you add a button that emits the required event:
<button onclick="Livewire.emit('openModal', 'hello-world')">Open Modal</button>When you click the button, the modal should appear:
Tip! Inside existing Livewire components, you can use the wire:click and $emit shorthand:
<button wire:click="$emit('openModal', 'hello-world')">Open Modal</button>Styling your modal
Right now, the modal looks a bit... plain. I like to use a Blade component for my modal to re-use the same structure and style throughout my entire application. Let's take a look at how this works.
First, create a new component blade file: resources/views/components/modal.blade.php and add the following content:
@props(['formAction' => false])

<div>
    @if($formAction)
        <form wire:submit.prevent="{{ $formAction }}">
    @endif
            <div class="bg-white p-4 sm:px-6 sm:py-4 border-b border-gray-150">
                @if(isset($title))
                    <h3 class="text-lg leading-6 font-medium text-gray-900">
                        {{ $title }}
                    </h3>
                @endif
            </div>
            <div class="bg-white px-4 sm:p-6">
                <div class="space-y-6">
                    {{ $content }}
                </div>
            </div>

            <div class="bg-white px-4 pb-5 sm:px-4 sm:flex">
                {{ $buttons }}
            </div>
    @if($formAction)
        </form>
    @endif
</div>
If you are unfamiliar with Laravel Blade components, be sure to check the Laravel documentation. You can think of it as the old fashion include('file'); but with some cool features like $slots and properties.
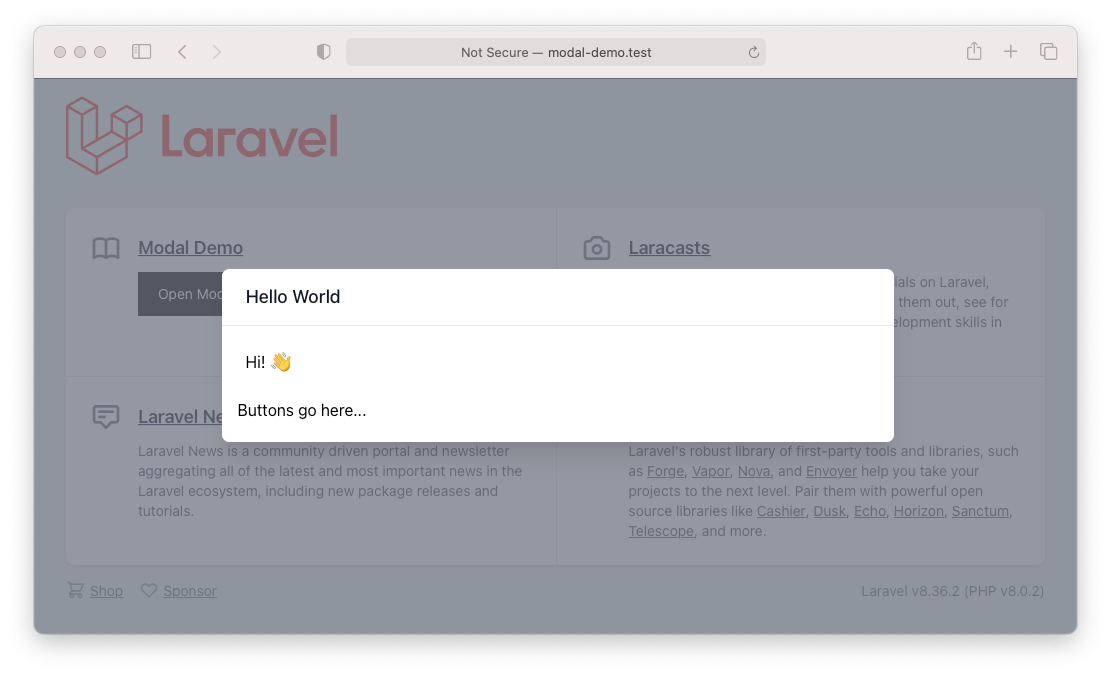
To see this in action, we can use this component in our hello-world modal:
<x-modal>
    <x-slot name="title">
        Hello World
    </x-slot>

    <x-slot name="content">
        Hi! 👋
    </x-slot>

    <x-slot name="buttons">
        Buttons go here...
    </x-slot>
</x-modal>
As you can see, the slots correspond with the $variables in your modal Blade component. If you re-open your modal, things should start to look taking shape:
You might have seen that we did not set the $formAction. I only define this property if the form should execute a certain method when submitting the form. If the modal does not have a form, the Blade component will hide the form element. If you want to execute the update method when submitting the form, for example, you must change the modal opening component tag to:
<x-modal form-action="update">So a full example of a modal that can count looks like this:
<?php

namespace App\Http\Livewire;

use LivewireUI\Modal\ModalComponent;

class HelloWorld extends ModalComponent
{
    public int $counter = 0;

    public function update()
    {
        $this->counter++;
    }

    public function render()
    {
        return view('livewire.hello-world');
    }
}<x-modal formAction="update">
<x-slot name="title">
Hello World
</x-slot>
<x-slot name="content">
Hi! 👋 {{ $counter }}
</x-slot>
<x-slot name="buttons">
<button type="submit">Start counting</button>
</x-slot>
</x-modal>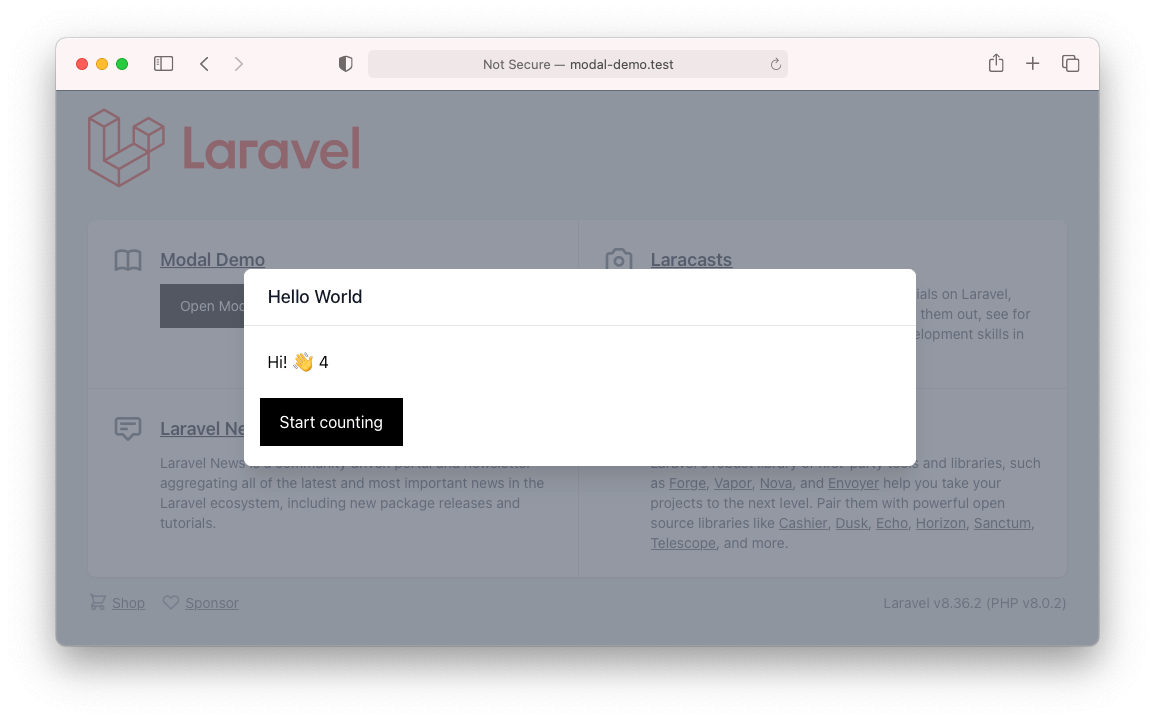
How to change the width of your modal
If you want to adjust the width of your modal you can do so by adding a static method called modalMaxWidth to your modal component.
<?php

namespace App\Http\Livewire;

use LivewireUI\Modal\ModalComponent;

class HelloWorld extends ModalComponent
{
	// ...

    public static function modalMaxWidth(): string
    {
        // 'sm'
        // 'md'
        // 'lg'
        // 'xl'
        // '2xl'
        // '3xl'
        // '4xl'
        // '5xl'
        // '6xl'
        // '7xl'
        return '4xl';
    }

	// ...
}
How to close your modal
The modal will close if you click outside the modal or hit the escape key. It's also possible to close the modal using events. This has a similar syntax as we've used earlier:
<button wire:click="$emit('closeModal')">Close Modal</button>You may also close a modal from the modal component using a helper method. Let's say we want the modal to close after someone clicks the 'Start counting' button and the counter has been updated:
class HelloWorld extends ModalComponent
{
    public int $counter = 0;

    public function update()
    {
        $this->counter++;

        $this->closeModal();
    }

    // ...
}
By default, the modal will close when you hit the escape key. If you want to disable this behavior, add the closeModalOnEscape method to your modal component and return false.
    public static function closeModalOnEscape(): bool
    {
        return false;
    }
Opening child modals
The Wire Elements modal component supports unlimited modal components while maintaining state. This means the state of every modal stays the same, even when navigating to other modals. The state is only destroyed when the entire modal is closed.
Let's create a second modal:
<?php

namespace App\Http\Livewire;

use LivewireUI\Modal\ModalComponent;

class ChildModal extends ModalComponent
{
    public $name;

    public function mount($name)
    {
        $this->name = $name;
    }

    public function render()
    {
        return view('livewire.child-modal');
    }
}This modal is almost identical, except I've added a mount method that receives a name. The goal is to open this modal from our HelloWorld modal and display the name we pass.
The blade file for the ChildModal component looks like this:
<x-modal>
    <x-slot name="title">
        Hi! 👋 {{ $name }}
    </x-slot>

    <x-slot name="content">
        You are looking at a child component
    </x-slot>

    <x-slot name="buttons">
        <button wire:click="$emit('closeModal')">Close Modal</button>
    </x-slot>
</x-modal>
To open this modal from our HelloWorld modal, we use the same syntax we've used earlier to open our HelloWorld modal, but we are going to pass a third argument which is a JSON encoded object that holds our name:
<button wire:click='$emit("openModal", "child-modal", @json(["name" => "Philo"]))' type="button">Open Child</button>
As you can see, the parameter is resolved by Laravel's dependency injection system when the mount method was called. Now the cool thing about the Livewire UI modal is that it keeps track of your modal history. If you click 'Close Modal' from your child modal, you will see it returns to the previous modal. Cool right?
This is, of course, also possible via your component by using the emit helper from Livewire:
public function someComponentMethod()
{
    $this->emit("openModal", "child-modal", ["name" => "Philo"]);
}
Force closing child modals
In some cases, you might not want to go to the previous modal but instead close the entire modal component. You can use a helper method inside your child component to do so:
class ChildModal extends ModalComponent
{
    // ...

    public function someComponentMethod()
    {
        $this->forceClose()->closeModal();
    }

    // ...
}
If you want to close a modal with a button instead of a method in your modal component, you can use the $emit helper again, as we did earlier, to close our first modal. This time we will pass a second parameter that indicates we want to force close:
<button wire:click="$emit('closeModal', true)">Force Close Modal</button>How to emit events while closing modals
Often you want to update a different Livewire component when changes have been made in a modal component. For example, when you have a user's overview and can edit a user via a modal, you want to update the user overview if a change has been made.
You can achieve this by making use of Livewire events. The Wire Elements modal package has a helper to make this very easy. In this example, we will change the counter and set it to 10 from our child modal. Let's update our child modal close button to call a function instead of emitting an event:
<x-modal>
    <x-slot name="title">
        Hi! 👋 {{ $name }}
    </x-slot>

    <x-slot name="content">
        You are looking at a child component
    </x-slot>

    <x-slot name="buttons">
        <button wire:click="closeAndUpdateHelloWorld">Close Modal</button>
    </x-slot>
</x-modal>
Now let's create the closeAndUpdateHelloWorld method inside our ChildModal.
class ChildModal extends ModalComponent
{
    // ...

    public function closeAndUpdateHelloWorld()
    {
        $this->closeModalWithEvents([
	        'childModalEvent', // Emit global event
            HelloWorld::getName() => 'childModalEvent', // Emit event to specific Livewire component
            HelloWorld::getName() => ['childModalEvent', [10], // Emit event to specific Livewire component with a parameter
        ]);
    }

    // ...
}
The closeModalWithEvents helper makes it easy to close the modal and emit any events. The method accepts an array of events, but it's also possible to pass the component name you want to target, followed by the event name and parameters.
Let's use the following approach for now and target our other component and pass the counter parameter.
HelloWorld::getName() => ['childModalEvent', [10]]To update the counter on our HelloWorld component, we need to define a listener, which listens to the childModalEvent. If you are unfamiliar with Livewire event listeners be sure to check out the Livewire documentation.
class HelloWorld extends ModalComponent
{
    public int $counter = 0;

    public $listeners = [
        'childModalEvent' => 'setCounterValue',
    ];

    public function setCounterValue($count)
    {
        $this->counter = $count;
    }
}
So in this example, if the HelloWorld component receives an event with the name childModalEvent it will call the setCounterValue method and pass the event parameter which is 10. Give it a try! When you close the ChildModal the HelloWorld modal will become visible again but this time the counter will be set to 10.
How to skip modals
In some cases, you might not want to go back to a previous modal when closing a child modal. For example, let's say we have the following four modals:
- User Overview
- View User
- Edit User
- Delete User
If a user is deleted and we close the modal we would return to the edit user modal. This is something which we don't want because the user doesn't exist anymore. So instead of going from "Delete User" to "Edit User" we want to go all the way back to the "Users Overview" modal. This means we will need to skip two modals. You can do this with the skipPreviousModals helper:
class DeleteUser extends ModalComponent
{
    public $user;

    public function mount(User $user)
    {
        $this->user = $user;
    }

    public function delete()
    {
        $this->skipPreviousModals(2)->closeModal();
    }

    public function render()
    {
        return view('livewire.confirm-delete-user');
    }
}
Just pass the number of previous modals/history you want to skip and the Wire Elements modal package will take care of it.
That's it!
Well done, you've just created your first modal with Livewire. If you love Laravel and Livewire ❤️ be sure to follow me on Twitter for more Laravel and Livewire tips, tricks, and packages.
Wire Elements Pro - Expertly crafted Livewire components 🚀
Modals, slide-overs, insert commands, and more components are coming. Compatible with Tailwind CSS and Bootstrap.
I'm thinking about releasing a premium video course in the near future (if enough people are interested) where I will show you how to build a real-world application from start to finish using Laravel, Livewire, and Tailwind CSS. I will be covering everything, from registering a domain, setting up a server, writing tests, you name it. Subscribe if you are interested and want to be notified, and you might also get access for free as I will be doing a giveaway when the course launches.